Find Product by Picture Timeline: From Photo to Purchase
A find product by picture timeline is the shopping path from taking or uploading a photo to matching the item, comparing offers, verifying the seller, and buying safely. The key is not just finding a visual match, but confirming the exact product, price, stock, reviews, return terms, and merchant trust signals before checkout.
> A Shop By Image workflow should identify products from photos, separate exact matches from similar matches, and compare prices across stores before checkout.
- The safest photo-to-purchase flow is capture, crop, match, refine, compare, verify, and buy.
- Visual search works best when the product is clear, well lit, fully visible, and distinctive.
- Seller checks, review checks, and price comparison matter because visual matches can still lead to wrong, overpriced, or risky listings.
Find Product by Picture Timeline Definition for Online Shoppers
A find product by picture timeline is the full buying workflow from image capture to product matching, offer comparison, seller review, and final checkout decision. It is broader than reverse image search because it does not stop at “what is this?” It asks “is this the right item, from the right seller, at the right total cost?”
Shoppers may describe the same process as photo to purchase steps, a visual shopping workflow, or an image search buying process. The wording changes, but the job stays the same: start with the image, get buyable results, and check the seller page before paying. A Shop By Image app can support this workflow by turning a photo into product candidates and price comparisons, but the shopper still verifies the listing before paying.
Same-looking is not always same-product.
Five Facts About the Visual Shopping Workflow
- Clear, well-lit, tightly cropped images usually improve product matching because the tool sees the item, not the room around it.
- AI shopping tools compare visual features such as shape, color, pattern, logos, texture, and category clues against product catalogs.
- The standard photo to purchase steps are capture, upload, match, refine, compare, verify, and buy.
- Branded and widely sold products are easier to identify than generic, vintage, custom, handmade, or partly hidden products.
- Seller verification and price comparison reduce scam, counterfeit, and overpayment risk, especially when a deal looks unusually cheap.
Most online shoppers already move between screenshots, retailer pages, and cart checks. Pew Research Center found that 79% of Americans had made an online purchase, and Google says Lens is used for more than 20 billion visual searches each month, including shopping searches (https://www.pewresearch.org/internet/2016/12/19/online-shopping-and-e-commerce/; https://blog.google/products/search/google-lens-features/). Those numbers explain the demand, but the safer habit is still manual review before checkout.
How the Image Search Buying Process Works Behind the Scenes
The image search buying process works by cleaning up the picture, extracting visual signals, and comparing those signals with retailer listings. In technical terms, the tool creates image embeddings, which are compact visual summaries a system can compare quickly.
First, the photo may be preprocessed. That can mean cropping the frame, sharpening focus, isolating the object, and reducing background clutter. A white-background product photo is easier than a cropped creator mirror selfie, but both can work if the item is visible.
Next, the system looks at silhouettes, colors, brand marks, material, patterns, and category context. A ribbed knit texture, a sneaker sole shape, or a bag clasp can change the result set. Catalog matching then ranks exact products and similar options.
AI can return a product match, not proof. Prices, stock status, shipping times, and seller details can change after the match appears, so the retailer listing still needs review.
Before You Start: What You Need for a Better Product Photo
Start with the best image you can get, then remove anything that could confuse the search or expose private details. A cleaner input gives the visual shopping workflow a better chance of finding the right item before you compare stores.
- Choose the clearest available source, whether that is a fresh photo, a saved screenshot, or a retailer-style product image. Sharp edges, true color, and steady focus usually beat a zoomed-in blur.
- Keep the item’s identifying parts in frame. For clothing, that may be the pattern, tag, buttons, or fabric texture; for electronics, it may be the model label, ports, or brand mark.
- Crop out personal background details before uploading a photo from your camera roll. Remove faces, addresses, screens, license plates, or anything else that does not help identify the product.
- Gather clues you can use to verify results later, such as size, colorway, brand, model number, material, or measurements.
- Plan to check at least two retailers before checkout. A match can look right while the price, shipping speed, return policy, or seller quality is worse than another option.
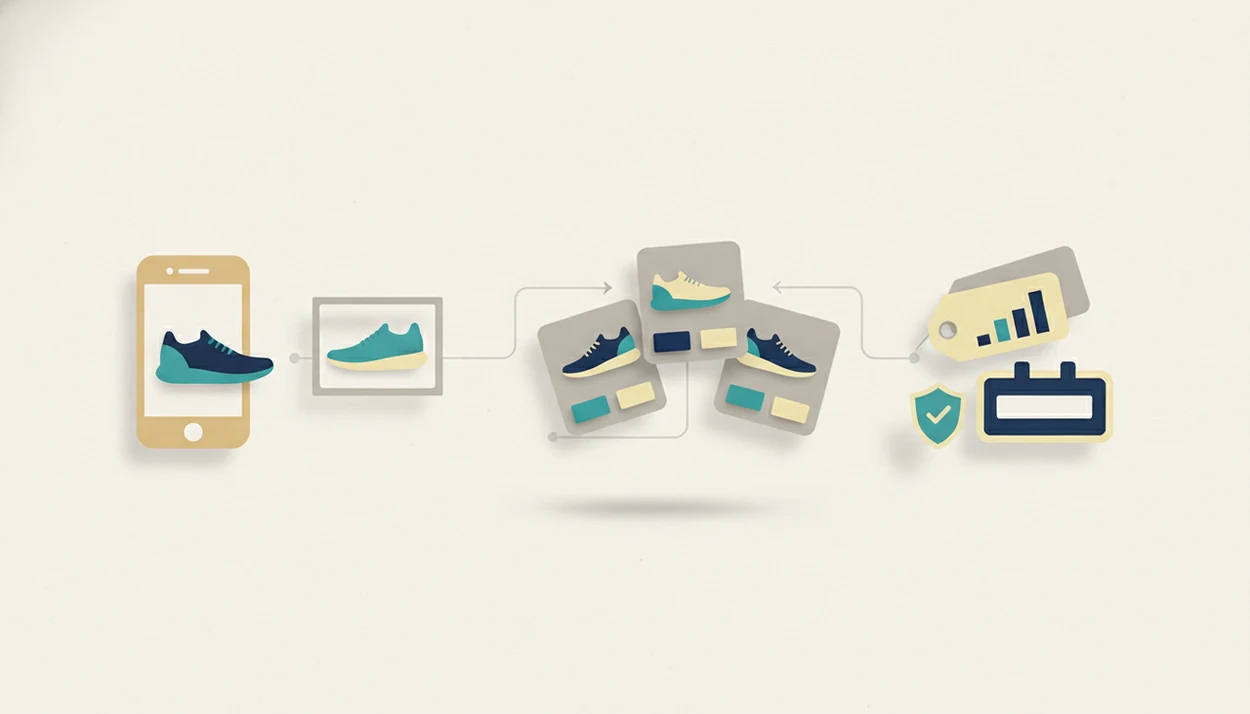
How to Use a Find Product by Picture Timeline
Use the timeline as a checklist, not a one-tap buying shortcut. For shoppers, a staged photo workflow is often safer than a single reverse-image search because it adds price, stock, return, and seller checks before payment.
- Capture the product in bright, even light with the full item visible; take multiple angles if the shape or label matters.
- Crop away background clutter while keeping useful details like logos, stitching, hardware, soles, tags, or dimensions.
- Upload the image to a shop-by-image app such as Invy, or use an app that identifies products from photos.
- Review exact matches separately from similar matches, especially when colorway, size, or model number may differ.
- Compare total cost, shipping, reviews, availability, return policy, and warranty terms across stores.
- Verify the seller’s legitimacy before purchase by checking ratings, business details, secure checkout, and return support.
A good AI shopping assistant and product finder app that identifies products from photos and compares prices across stores to find the best deal delivers candidates and comparisons, not a guarantee that a listing is genuine.
Step 1: Capture a Product Photo for Better Visual Search Matches
A better starting photo gives visual search more useful information. Use natural light or bright, even indoor lighting, and keep the full product in focus.
Avoid glare, motion blur, cluttered backgrounds, and extreme angles. A watch strap cropped from a wrist shot may be enough if the texture, buckle, and case edge are clear. Shoes, bags, furniture, apparel, and unbranded items often need more than one angle because the identifying details may sit on the side, sole, tag, or back panel.
Screenshots can work too. A shopper saving a blurry Instagram Story screenshot before it disappears may still get similar options, but a sharp retailer image usually produces better matches. If the photo is weak, try a second image before assuming the product cannot be found.
Step 2: Crop the Picture for a Cleaner Image Search Buying Process
Cropping helps the tool focus on the product instead of faces, rooms, pets, or unrelated objects. Crop tightly around the item, but do not cut away the parts that identify it.
Keep details such as logos, hardware, sole shape, stitching, fabric grain, tag placement, and pattern repeats. Overcropping can backfire. If only a zipper pull remains, the app may miss the product category and proportions.
There is also a privacy benefit. Cropping can remove faces, addresses, license plates, screens, and personal surroundings before upload. That matters when a gallery grid is full of product screenshots mixed with family photos.
A careful crop can turn a weak match into a usable match, especially when the original image came from social media or a crowded room.
Step 3: Match the Photo to Products Across Stores
After upload, sort the result set by match type before thinking about checkout. An assistant like Invy can pull possible matches from multiple stores, which is useful when one retailer is sold out or overpriced.
| Match type | What it means | What to check |
|---|---|---|
| Exact match | The listing appears to be the same product | Title, brand, model, colorway, size, material, dimensions |
| Near match | The item looks close but may differ | Fabric, hardware, measurements, generation, finish |
| Inspiration match | The style is similar, not the same item | Price point, quality, reviews, return terms |
The most useful result is not always the first one. A search result may show the right color but the wrong size, or a similar handbag with cheaper hardware. Branch into alternatives when the exact item costs too much, ships too slowly, or is out of stock. For a broader buying path, the where to buy this product workflow covers the store-finding step in more detail.
Step 4: Compare Prices in the Photo to Purchase Steps
Price comparison should use total cost, not only the list price shown beside the image. Add shipping fees, taxes, discounts, promo codes, delivery time, return costs, and warranty terms before choosing.
Reviews also deserve cross-checking. A listing with five glowing comments on one marketplace may look weaker after you check another seller page. The tiny out-of-stock label often appears only after tapping into the retailer page, which is annoying but important.
Lowest price is not always the safest purchase because return friction, missing warranty support, slow fulfillment, or unknown sellers can erase the savings. For shoppers comparing offers on a phone while standing in a checkout line, a quick compare prices from photo check can prevent a rushed buy.
Confirm the final price and stock status on the retailer site before checkout.
Step 5: Verify the Seller Before Buying by Picture
“Is it safe to buy from an image search result?” Only after you verify the seller, the listing, and the checkout path.
Check the seller rating, review history, business name, return policy, customer support options, and secure checkout. Look for red flags such as unusually low prices, copied product images, vague shipping promises, no return address, strange domain names, or pressure-style countdowns. Branded fashion, electronics, accessories, sneakers, and trending products deserve extra caution because counterfeit listings often use convincing photos.
The risk is not theoretical: FTC Consumer Sentinel data tracks online shopping problems as a major fraud-report category, with reported losses updated annually (https://www.ftc.gov/news-events/data-visualizations/consumer-sentinel-network-data-book).
If the product match looks right and the seller page feels wrong, reset the plan. Search again.
Common Mistakes in a Visual Shopping Workflow
Common mistakes in a visual shopping workflow usually come from treating a match as a purchase decision. Fix the image first, then verify the listing.
- Exact-match assumption: A similar result may not be the same product. Compare brand, model, size, material, and colorway before buying.
- First-link trust: The first shopping result is not automatically the safest seller. Check ratings, policies, support details, and checkout security.
- One blurry photo: Difficult items need better inputs. Take another angle, crop tighter, or use a clearer screenshot.
- Reverse-search confusion: Duplicate-image tools find reused pictures, while AI product recognition tries to understand the object in context.
- Missing listing details: Ignoring return terms, dimensions, model number, or fabric can cause the wrong order.
For shoppers who want the shorter version, find product by picture is the basic search task. The timeline adds the buying checks.
Limitations
Visual product search is useful, but it cannot remove every shopping risk. It works best when the item is clear, distinctive, branded, and widely sold.
- Generic, vintage, custom, handmade, rare, or heavily obscured items may return weak matches.
- Lighting, camera quality, background clutter, reflections, and odd angles can lower accuracy.
- AI may identify the product while live stock, price, shipping, or seller details are outdated.
- Seller verification cannot eliminate all counterfeit, fraud, or fulfillment risk.
- Lowest-price recommendations may miss warranty support, return friction, sustainability, or service quality.
- Similar-looking products can differ in sizing, material, construction, or authenticity.
- Privacy matters when uploading personal photos or saving a visual wishlist in any Shop By Image workflow.
- Visual tools should not be used for face search, people identification, jewelry appraisal, or proof of authenticity.
The practical rule is simple: use the image to start, then use the listing to decide.
FAQ
How do I buy from a picture?
Capture or upload the image, review product matches, compare prices and availability, verify the seller, then check out on the retailer page. Do not buy until the exact product details and return terms match what you need.
Can ChatGPT find a product?
ChatGPT can help interpret an image or suggest search terms, but it may not provide live product listings, stock, or current prices. A dedicated shop-by-image app is better suited for product matches and price comparison across stores.
Is visual search always accurate?
No. Accuracy depends on photo quality, product distinctiveness, catalog coverage, lighting, angle, and manual verification of the listing.
What photo works best for finding a product?
A clear, well-lit, uncrowded image works best when the product is fully visible and in focus. Keep useful details such as logos, tags, texture, pattern, shape, and hardware.
Can I find cheaper alternatives from a product photo?
Yes. Similar-product results and cross-store comparison can reveal lower-priced alternatives, different shipping speeds, or available substitutes when the exact item is sold out.
How do I verify a seller before buying from an image search result?
Check the seller rating, review history, business details, return policy, support options, secure checkout, and unusually low-price red flags. Confirm the final price and stock on the retailer page.
Is Google Lens enough to buy a product from a picture?
Google Lens can be useful for broad visual search and product discovery. A dedicated shopping assistant focuses more directly on product matching, similar options, and price comparison before purchase.